Introduction
Jenkins is a continuous integration system used widely by software development groups. By the other hand, Docker show us a new way to structure ours services.
Migrate our Jenkins system to the philosophy provided by Docker can be a desire or a goal in our development group. However, you may have some questions or doubts:
- Will be lost the configurations made so far ?
- Will be lost the statistics of jobs?
- ¿How many time the Jenkins service will be down?
The answer in both cases is no. The objective of this article is show how modify our structure of service for Jenkins without start from the beginning.
All modifications showed in the article where realized in the same server although you can use a second one.
Jenkins just will be out of service during 5 seconds.
Prerequisite
To take the steps mentioned in this article you must complete the following requirement:
- Having Jenkins installed.
Environment
The environment configuration used for this article is the following:
### Continuous Integration System ###
         OS: Ubuntu 14.04
    Jenkins: 1.645
     Domain: jenkins.example.com
The jenkins.example.com domain is used to access to the Jenkins system.
Step One – Install Docker.
The best information related with Docker installation can be found on his Official Website. During the Docker installation you must take into account the operating system installed in your server.
Step Two – Start the Jenkins service.
Start Jenkins
To start Jenkins using Docker you must write the following command:
docker run -p 8085:8080 --name jenkins jenkins
-p 8085:8080link the port8080of jenkins container with the host port8085.--name jenkinsestablish the namejenkinsas the container name created.
Check if Jenkins works
Access to the following web link to check if Jenkins works correctly.
http://jenkins.example.com:8085

Stop the service
It is necessary stop the service in order to move on with the configurations.
Ctrl-C
Step Three – Set a data volume for Jenkins.
Create structure
Create folders to store both, data and configurations for the service.
sudo mkdir -p ~/jenkins/data
Establish the permission 777 to the created folders so that the jenkins user can write in them.
sudo chmod -R 777 ~/jenkins/
- jenkins folder: store Docker configurations.
- data folder: store Jenkins data.
Start the service using the data volume
Write the following command to start the service using the data volume:
docker run -d -p 8085:8080 --name jenkins-with-volume -v ~/jenkins/data:/var/jenkins_home jenkins
- We use
-dto start Jenkins as a service.
You can see the files created by Jenkins inside the folder ~/jenkins/data. These files are Jenkins configurations.
Stop the service
It is necessary stop the service so that to move on with the configurations.
docker stop jenkins-with-volume
Step Four – Migrate the information to the container.
Once the folders structure has been created, the migration of the Jenkins information is very simple.
First, you must delete all the information located inside the folder ~/jenkins/data.
sudo rm -r ~/jenkins/data/*
sudo rm -r ~/jenkins/data/.*
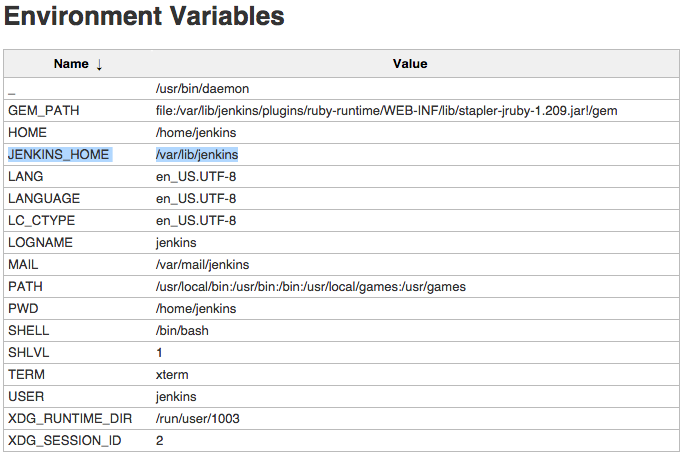
After, search the value of JENKINS_HOME inside the Jenkins website on: Jenkins > Manage Jenkins > System Information.
JENKINS_HOME is the physical path where Jenkins has his information.

Once identified the path of Jenkins information, you can copy those files to the folder ~/jenkins/data.
sudo cp -r /var/lib/jenkins/* ~/jenkins/data/
Start the service
It is necessary restart the service and checking that Jenkins have all the information in the link http://jenkins.example.com:8085.
docker start jenkins-with-volume
Step Five – Install Docker Compose.
The best information related with Docker Compose installation can be found on his Official Website.
Step Six – Use Docker Compose in the process.
Create YAML file
Create the file docker-compose.yml in the folder ~/jenkins/.
touch ~/jenkins/docker-compose.yml
Copy the following information inside the file:
app:
  image: jenkins
  ports:
    - 8085:8080
  volumes_from:
    - data
  restart: always

data:
  image: busybox
  volumes:
    - /home/user/jenkins/data:/var/jenkins_home:rw
appis the Jenkins service.datais the container for Jenkins data.restart:alwaysassure to start the service when the host restart.- We use
userinside the string/home/user/jenkins/data:/var/jenkins_home:rw porbecause must be a physical path.
Stop the service
The following command stop the Docker service:
docker stop jenkins-with-volume
Start the service using Docker Compose
This time the Jenkins service starts using Docker Compose. To do this, type:
cd ~/jenkins/
docker-compose up -d
Use this link: http://jenkins.example.com:8085 to check the right behaviors.
Step Seven – Establish Jenkins as a Docker Service.
Modify the port inside the file yml
Modify the host port in the file docker-compose.yml. The file look like this now:
app:
  image: jenkins
  ports:
    - 80:8080
  volumes_from:
    - data
  restart: always

data:
  image: busybox
  volumes:
    - /home/user/jenkins/data:/var/jenkins_home:rw
Stop the Jenkins service
The Jenkins service is stopped using the following command:
sudo service jenkins stop
Start Jenkins as a Docker service
Restart the Jenkins service with Docker.
docker-compose up -d
Use this link http://jenkins.example.com to check the right behaviours.
Ready!!! Migration finished.
Final Thoughts
The philosophy of Docker to establish Containers as a Services (CaaS) is widely accepted by software community. By the other hand, Jenkins constitute a powerful tool for organize both process, Continuous Integration and Continuous Delivery. This article establish the following:
- Establish Jenkins as a service inside a container.
- The migration of Jenkins service allow keep the data and configurations.
- The Jenkins service just will be out of service 5 seconds during the migration.
Significant Revisions
Building and documenting Cloud solutions takes a lot of effort. Support me with GitHub Sponsors!
Sponsor on GitHub


